Final Cut pro

Final Cut pro
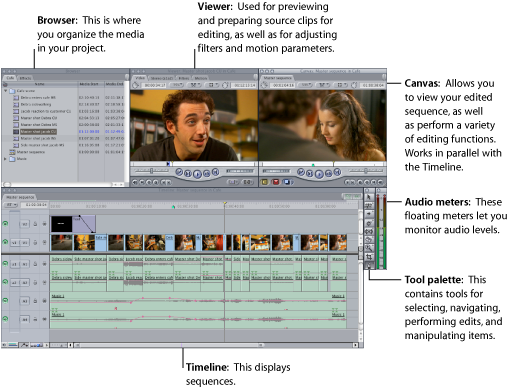
Browser (Top left box) Viewer ( top center box) Canvas (Top right box) Timeline ( Bottom long box)

Thursday, September 8, 2011

6. Setting Scratch Disk (Most Important)

The Scratch Disk refers to the location that Final Cut will save the ingested media that is used when editing a project. In our case we can set scratch disk to the folder we created in the 4th chapter (opening the folder). If you do not set it before you begin editing or importing media on a project, you may never be able to find where your files are going to.

How to set scratch Disk.

1) Start Final Cut Pro.

2) In the menu at the top click on Final Cut Pro... System Settings

3) Then select the tab for: Scratch Disk Settings

4) Near the top of the screen that appears you'll see a series of checked boxes for Video Capture, Audio Capture, Video Render and Audio Render.


Waveform Cache Set
Thumbnail Cache Set
Autosave Vault Set

These are three other Final Cut Pro settings, each of which also should be set to the same scratch disk as the first one.

It is especially important that you set the Autosave Set button to the same scratch disk, as this is where Final Cut Pro will periodically save copies of whatever you're working on so you don't lose your work if the computer crashes. You want to be sure that these automatically saved files are being saved to your scratch disk drive and folder.

Make sure all three Set buttons have been set, and follow the same directions as above to use Choose a Folder to set each of these to the same scratch disk.

When you're done and back at the Scratch Disk Settings Screen, leave the default settings for the other options, such as Minimum Allowable Free Space on Scratch Disks, Limit Capture...Size and Limit Capture Now.

And click on the button at the bottom labeled OK.
Tuesday, September 6, 2011

5. Opening Final Cut Pro

Find the icon of Final Cut Pro in your list of applications on the desktop. If can't find it then Click Finder - The top most or the first icon on the Desktop Menu. See Finder written on top after the apple sign which is always there. In the same line click 'Go'. You see the pull down menu. Click Applications. You get the full list of applications available on your system. Find Final Cut Pro which looks like this.


Double click it. It will take 30 seconds to 1 minute to open.

4. Opening the Folder

1. On a desktop use right click of your mouse you will get many options.
Use the first one saying New Folder. And the blue folder is created on your desk top. Name it . Drag and drop it in your hard Drive.

2. While working on Mac laptop hold control key and click the left click area of the mouse pad. You get the same set of options as above. use New Folder, name it . Use it.

3. Terms To Remember

Folder - (The Blue book icon) The very first step in editing that you create. Make a folder either in your hard drive or desktop first and then transfer it to hard drive. This folder is your main rented house in a hard drive where you will store all your raw stuffs like media files, audio files, stills, music etc. Even your Project will be saved here.


Project - This is the master file that Final Cut pro creates to store all information needed to edit your video - except the actual media itself. Once you create or open a project, it appears as a tab in the Browser. There’s no limit to the number of items, including clips and sequences, that can be stored in your project in the Browser.


Media Files - Media files are the raw materials you use to create your movie. A media file is a video, audio, or graphics file on your hard disk that contains footage captured from videotape or originally created on your computer. Before you can edit in Final Cut Pro, you need to capture media files from a video deck or camcorder to your folder in your hard disk/drive.

Clips - Once you have media files on your hard disk, you need a way of working with them in Final Cut Pro. A clip is the most fundamental object in Final Cut Pro. Clips represent your media, but they are not the media files themselves. A clip points to, or connects to, a video, audio, or graphics media file on your hard disk.

Sequence - A sequence is a container for editing clips together in chronological order. The editing process involves deciding which video and audio clip items to put in your sequence, what order the clips should go in, and how long each clip should be. Sequences are created in the Browser. To edit clips into a sequence, you open a sequence in the Timeline from the Browser.

Saturday, September 3, 2011

2. Baby Steps

1. Opening a folder (for e.g. -named "Test Amish' in your Hard Drive or desktop
2. Opening Final Cut Pro
3. Final Cut Pro tab's pull down menu has system settings room. set it to the folder's name.
4. Open Project in Final Cut Pro , save that too in the folder "Test Amish"
5. Import or send your files(audio, video, stills and all raw files by which you to edit) to the folder 'Test Amish" and then import it to project.
6. In browser click fils to view. They can be viewed in Viewer.
7. By clicking I (in) and O (out) from the typing pad you can make selection of the small clip you want to keep.
8. By clicking the red button (overwrite) below the Canvas you can brong your selected clip to the timeline making first sequence.
9. If you select many clips (as required ) with the same process - you have done a story.

Friday, September 2, 2011

1. The BIG Question

The Big question is not how to edit. Basic Editing is as easy as cleaning or organizing your work desk or your messy dining table at home. Pick up something, keep at right place, and throw some stuffs in trash. That's it. The Big question to my understanding is to know how to organize files or projects before and after editing.